To sign up for our daily email newsletter, CLICK HERE
It’s okay to dream big and want to see what the realization of that dream would look like. For example, you can take a look at how your face might look in the group shot of your favorite sports team. How? With the magic of picture montage! To invoke the magic of photo editing, all you need is some basic knowledge and an easy-to-use program. Just keep reading this guide to arm yourself with both!
Before You Begin
Editing goes much more smoothly when you do some preparations. To ensure the most efficient and hassle-free montage of photos, put some time into the following:
Consider the theme or concept
Do you want to be seen as a player, a coach, or a passionate fan? Think about the story you want to tell with the photo. Brainstorm different poses or actions that could match the team’s spirit. This will help you in selecting the right photo of yourself later on.
Pick a proper base photo
Choose a high-resolution photo of the sports team that you want to join. Make sure the photo has good lighting and clear details so that it can blend well with your photo. Look for a base photo that includes the entire team or a significant portion of it. This will make it easier to find a suitable spot for you in the image.

Find a fitting photo of a person you want to add
Select a photo of yourself that has a similar lighting and angle to the base photo. This will help create a more realistic final result. Consider wearing clothing that matches the team’s colors or uniform. This will enhance the visual cohesion between you and the rest of the team members.
Choose a proper editing app
Look for a photo editing app that offers a range of features, such as layering, masking, and blending modes. This allows you to seamlessly integrate yourself into the base photo. Ensure that the app has user-friendly controls and a straightforward interface. This will make the editing process smoother and more enjoyable.
We recommend trying PhotoWorks, an accessible and versatile photo editor for Windows and Mac. Here’s a more detailed guide on how to make a montage of photos with it, but we will cover the basics here and now.
How to Make a Photo Montage
Let’s dive into the process! When crafting a photo montage, it’s crucial to select each element carefully, as they will come together to form a cohesive and visually stunning piece of art. PhotoWorks offers a user-friendly background changing tool that allows you to effortlessly modify or eliminate the surrounding elements with just a few strokes.
Now, let’s explore the step-by-step process of how to create a photo montage using PhotoWorks:

Step 1.
Install and launch the program. Then load the photo you want to cut your face out from. You can either drag and drop an image or use the file browser.
Step 2.
Go to the Tools tab and select the “Change Background” feature.
Step 3.
Use the Object brush to mark yourself in the photo with a green line. You can adjust the size and feather as you see fit. There is no need for precision – the program can determine object borders automatically.
Step 4.
Switch to the Background brush and mark the surroundings you want to remove with a red color. PhotoWorks will automatically separate the object from the background based on your markings. Click “Next” to proceed.
Step 5.
If needed, remove background leftovers or restore parts of your face that have been removed. Then click “Next”.
Step 6.
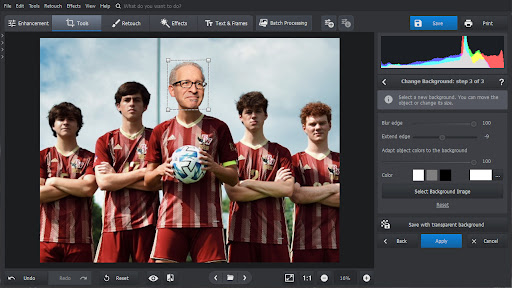
Click “Select Background Image” and load the photo of the sports team. Then adjust the size and position of your face, blur and extend its edges, and make it blend in better with a dedicated slide. Then click “Apply”.
Step 7.
If everything looks as you want, click the “Save” button and export your work. You have a bunch of quality settings and four file types to choose from: JPEG, PNG, BMP, and TIFF.
Over to You
And about all you need to know to start making creative and funny photo montages. Regardless of the type of editing you want to try or your level of editing expertise, we suggest giving PhotoWorks a try. This editor offers impressive capabilities without requiring professional-level photo post-production skills. However, whether you decide to use this software or not, we hope you found this article helpful.