To sign up for our daily email newsletter, CLICK HERE
French nail tips are one of the most stylish and classic designs for manicures. And the best thing is, you don’t have to go to a salon. French tips are easy enough to do yourself.
This article gives insight into how to do your own French tip nails at home. As well as learn about how this style originated and why it’s so popular.
What are French Tips?
French manicures are hands down one of the most popular nail designs. The traditional French manicure uses neutral colors for a timeless and classy look. Normally, a light pink color or neutral nude polish is used for the base coat.
French tip nails are defined by the use of a white line across the top of the nail to give it a defining look. The thickness of the line varies according to the shape and size of the nail and your preference.
What is the Origin of French Nails?
French tip manicures supposedly date back to the 1920s. However, the modern twist that we know is actually credited to a man. Max Factor put a modern twist on the French manicure in order to sell more nail polish. Little did they know that this nail style would make such a big splash!
French Nail Tips DIY
1. Prep Your Nails
Before you begin, take time to clean, cut and properly care for your nails. This extra step helps your French tip manicure last longer. As well it promotes good health and growth for your natural nails.
2. Choose Your Nail Shape
As you will see later in this blog, there are quite a few styles, designs, and lengths for French tips. Choose the one that best suits your lifestyle and personal taste.
3. Apply the Base Coat
Ideally, you will use a light pink or neutral shade for your base coat for a French tip manicure. However, there is no rule that says you can’t go with a modern flair and use the color of your choice. Opt for pastel, neon, neutral, bold, or whatever shade your heart desires.
4. Paint Your Nail Tips
Now you can paint the white line that separates the base coat from the nail tip. Use nail tape if you are not comfortable with freehand. Paint the French tip on the base coat once it is fully dried. Choose your personal preference for the thickness of the French tip.
5. Apply the Pink Coat
Apply a thin layer of sheer and soft pink polish for a timeless French tip design.
6. Apply the Top Coat to Seal the Look
Wait until the last coat is fully dry before adding the top coat. This will seal in the French tip manicure, so it lasts longer.
Below are some of the most popular styles for French tip nails. You can opt for one of these styles or go bold and create your own unique take on the French tip manicure!
Different Designs for French Nails
Classic French Tips
For classic French Tip Nails, the base layer is always a neutral or light pink shade, while the tip is white. The defining line is usually curved to follow the natural nail or painted straight across.
Double French Tips
The double French tip manicure is very popular right now. Like the classic look, apply a base layer and then paint the tip the color of your choice. However, with this look, paint a second thin line below the thicker tip for a funky and unique flair.
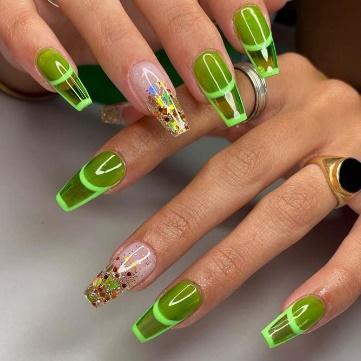
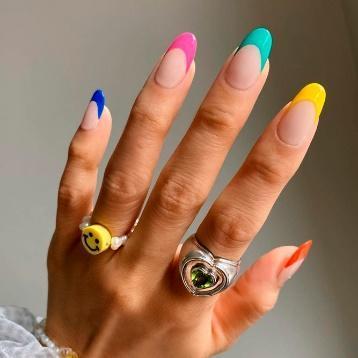
Color Variations
While the classic French tip design is known for its pink and neutral hues, it is always fun to incorporate your own favorite shades of polish. For a more casual look, use one shade only and apply the thickness of the defining white line of your choice. Or you can use two different shades or even go for an ombre or rainbow effect.
Decorative Accents
Dress up your French tips with some gems or diamonds to make it look even more elegant. As well you can add your favorite decals or designs to personalize your French tip manicure.
Now that you know more about French tip manis, check out some of the prettiest designs below:
