To sign up for our daily email newsletter, CLICK HERE
Losing your favorite photos can be a nightmare. Accidental deletions, a lost phone, or a broken device can result in your precious memories vanishing. That’s why knowing how to transfer iPhone photos to external hard drive is crucial. It provides an added layer of security and peace of mind. In this article, we’ll explore simple methods to back up your iPhone photos to an external drive and discuss the process and benefits of each approach.
Way 1. Back Up iPhone Photos to External Hard Drive via iOS Transfer Tool
If you’re looking for a hassle-free way to back up your iPhone photos to an external hard drive, consider using FonePaw iOS Transfer. This versatile tool simplifies the entire process, allowing you to transfer photos, videos, music, contacts, and SMS between your iPhone and external hard drive.
With FonePaw iOS Transfer, you can:
- Quickly and easily back up your entire photo library to your external hard drive, including iOS-exclusive HEIC/HEIF image format that offers smaller file sizes without compromising quality.
- Manage and organize your photos directly on the external hard drive, deleting unwanted ones and backup other important data like videos, music, SMS and contacts.
- Enjoy seamless backup and restore without iTunes. Photos are securely backed up, eliminating data loss or overwrite risks.
To back up your iPhone photos to an external hard drive using FonePaw iOS Transfer, follow these simple steps:
STEP 1. Download and install FonePaw iOS Transfer on your computer, and connect your iPhone and external hard drive via USB Cable.

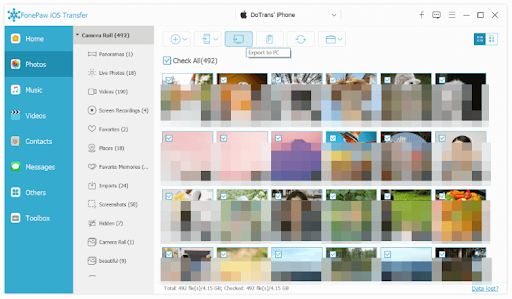
STEP 2. Launch FonePaw iOS Transfer from the main interface, select “Photos,” choose the photos you want to back up, and click “Export to PC.”

STEP 3. Select your external hard drive as the destination and click “Save.” The FonePaw iOS Transfer Tool will instantly transfer photos from the iPhone to the external hard drive.
While the FonePaw iOS Transfer Tool provides a convenient method for transferring photos from an iPhone to an external hard drive, an alternative approach is available using Windows File Explorer. This option is handy if you prefer a more straightforward and system-native solution.
Way 2. Back-Up iPhone Photos to External Hard Drive with Windows File Explorer
If you’re a Windows user, you can easily back up your iPhone photos to an external hard drive using the File Explorer interface. This method allows you to directly access your iPhone’s storage and manually copy the photos you want to save.:
STEP 1. Connect your iPhone and external hard drive to your computer.
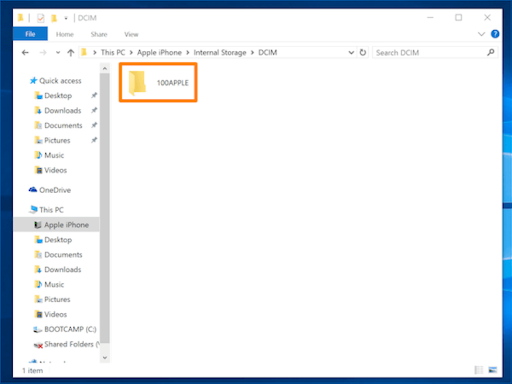
STEP 2. Open File Explorer, locate your iPhone, and navigate to the “DCIM” and “APPLE” folder (or a similarly named folder)

STEP 3. Select the photos you want to back up, copy them, and paste them onto your external hard drive to complete the backup process.

After reviewing the first two ways to back up iPhone photos to an external hard drive, let’s explore a third option that utilizes Image Capture on Mac.
Way 3. Back-up iPhone Photos to External Hard Drive with Image Capture on Mac
If you’re a Mac user, you have a built-in tool called Image Capture that simplifies the process of backing up your iPhone photos to an external hard drive. This user-friendly application allows you to preview and select the photos you want to transfer, making it a convenient option for managing your photo library.
STEP 1. Connect your iPhone and external hard drive to your Mac, then open the Image Capture app.
STEP 2. Select your iPhone from the list of devices and choose the photos you want to back up.
STEP 3. Click the “Import To” dropdown menu, select your external hard drive, and click “Import” to start the backup process.

Follow the above steps to back up your iPhone photos to an external hard drive using Image Capture. Your memories are safely stored and accessible on your Mac. If you prefer a simpler approach, there is an option to back up your iPhone photos to an external hard drive without a computer.
Way 4. Back Up iPhone Photos to External Hard Drive Without Computer
If you don’t have access to a computer, you can still back up your iPhone photos to an external hard drive using a Lightning-to-USB adapter and a USB-C external hard drive. This process is particularly convenient for iPhone 15 series users, as they come equipped with a USB-C port, eliminating the need for an adapter. This method allows you to store Live Photos, which consist of a HEIC photo and a MOV video file, on an external hard drive.
Here’s how to do it:
STEP 1. Connect your iPhone to the external hard drive using the adapter.
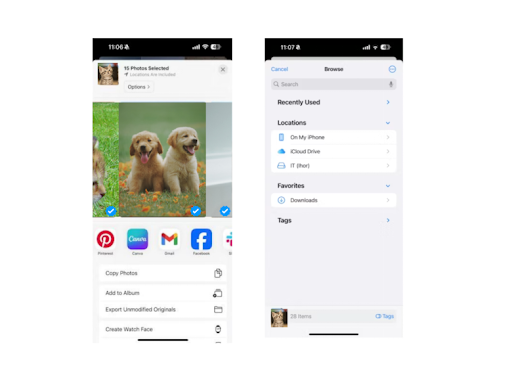
STEP 2. Open the Files app on your iPhone, navigate to the “Photos” folder, select the photos you want to backup, and tap the “Share” button.
Name: selecting-the-photos-for-the-backup
Alt: iPhone Photos Folder

STEP 3. Choose “Save to Files” and select your external hard drive as the destination.
The Bottom Line
Backing up your iPhone photos to an external hard drive is a simple yet essential step in safeguarding your precious memories. Whether you choose to use a dedicated iOS transfer tool like FonePaw iOS Transfer, rely on your computer’s file explorer or Image Capture app, or opt for a direct connection without a computer, the most important thing is to create a backup and protect your photos from unexpected loss.