To sign up for our daily email newsletter, CLICK HERE
Many Windows users have already moved on to Windows 11 lizenz since its official release in October 2021. The operating system’s rollout followed months of preview releases in the Windows Insider program, where Microsoft gathered info about bugs and resolved those problems.
While it may seem that the official version will come with no glitch, that’s not the case. If we’ve learned anything about Windows and windows 11 reddit, it’s that users have to deal with one issue or the other until Microsoft releases a fix. For more on Windows 2024, visit windows 11 pro license key.
One of the problems users have experienced on Windows 11 is the sound issue. As it turns out, the audio device stops working after a while or once they complete their upgrade. This article shows the possible causes of this problem and how to get rid of it.
What Causes the Sound Glitch on Windows 11?
Generally, software and hardware issues underpin sound problems in Windows. For starters, your system could be lacking sound because you unknowingly muted it or chose a different output device. This kind of misconfiguration is easy to resolve.
On the other hand, audio driver problems, sound card issues, and Windows audio service bugs could be complex.
Also, audio enhancements could lead to sound loss, especially with application conflicts.
How to Resolve the Sound Issue in Windows 11
To get rid of the sound problem for good, you have to fix the underlying cause of the problem. That means installing the correct driver if it’s a driver issue and changing the audio device if it’s a hardware problem.
We’ll start with the basic troubleshooting steps and make our way down to the complex ones.
Make Sure Your Sound Isn’t Mute
Many users run into a fit of panic without realizing that they muted their sound all the while. In some cases, the volume could be turned down to almost zero.
So, check the sound icon in the taskbar to ensure there’s no “x” mark beside it. You should also try increasing your system’s volume or the volume of the application you’re using.

Restart Your Computer
If you haven’t already, restart your computer and check if that resolves the problem. Sometimes, common system glitches such as app conflicts could result in loss of audio. Rebooting your computer means you’re restarting your programs and freeing up the system memory.
Select the Right Sound Device
Your computer could be silent because you set up the wrong device. This usually happens when you connect multiple audio devices to the system. These include headphones, Bluetooth speakers, and external speakers. Only one speaker will play sound at any time, and if Windows is still connected to a device that’s turned off, there goes your sound.
So, make sure your system’s built-in speaker is the default sound device. To do that, right-click on the sound icon in the taskbar and click on Sound Settings. Next, expand the “Choose where to play sound” category and click on the sound device right under it. Now, select your system’s audio device.
Run Audio Troubleshooter
The audio troubleshooter is Windows’ built-in repairer. It scans for and fixes common bugs preventing the system from producing sounds. These could include application conflicts or malfunctioning audio services. Here’s how to run it:
- Go to the Start menu and click on the Settings icon.
- As soon as the Settings app shows up, click on the Sound option.
- Scroll down the System > Sound screen and select Output Devices next to “Troubleshoot common sound problems.”

- The Troubleshooter window will now pop up and scan for sound problems.
- Allow it to apply the fixes to issues it may find.
Disable Audio Enhancements
Audio enhancements are designed to fine-tune your system’s audio experience. However, they end up causing problems when they’re not compatible with your sound device or driver. In some cases, conflicts with system and third-party applications could result in loss of audio. So, turn off audio enhancements and check if that resolves the problem.
- Launch the Settings application and click on Sound under System.
- Once you see the System > Sound page, select your audio device under “Choose where to play sound” to summon its Properties page.
- Next, scroll down the System > Sound > Properties screen and toggle off the Enhance Audio setting.
- After that, click on Advanced.
- Uncheck all the boxes beside the sound effects once the Enhancement tab of the Speakers/Headphones Properties dialog appears.
- Switch to the Spatial Sounds tab and select Off under Spatial Sound Format.
- Click on the OK button.
Restart Audio Device
Your computer might not produce sound because the audio card is not responding. You’ll have to jumpstart the device by restarting it. To do that, you’ll have to go through the device manager. Follow these steps:
- Right-click the Start button or tap the Windows logo + X keyboard shortcut.
- When you see the Power User menu above the Start button, click on Device Manager.
- Now, click on the arrow beside the “Sound, video and game controllers” section to expand it.
- Right-click on your sound card and select Disable Device in the context menu.
- Click on Yes after the confirmation panel pops up.
- If the System Settings Change dialog prompts you to reboot, click on the Yes option.
- After your PC restarts, press the Windows logo + X combo and click on Device Manager.
- Next, click on the arrow next to “Sound, video and game controllers” and right-click on your audio device.
- Now, click on Enable Device and select Yes in the confirmation prompts.
Restart Windows Audio Service
Your operating system’s sound processes are managed by the Windows audio service. According to Microsoft, audio devices won’t function properly if the service is disabled.
Now, the service might not be responding, hence the loss of sound. So, to fix the problem, restart it and check if your system’s audio comes on again.
Note that the Windows Audio Service depends on other services to work. So you’ll have to restart them as well.
You can go through the Services app or Command Prompt to restart Windows’ audio services.
Here’s how to use the Services app:
- Summon the Start menu and search for “Services.”
- Click on the Services app in the search results.
- After the app shows up, scroll down and look for the Windows Audio service and click on it.
- Next, click on Stop in the left pane and confirm.
- After the service stops, click on the Start button.
- Repeat the process for the Windows Audio Endpoint Builder and Remote Procedure Call services.
Using the Command Prompt:
- Start the Run dialog by right-clicking the Start button and selecting Run in the Power User menu.
- Tapping the Windows logo and I buttons on your keyboard will also open the dialog box.
- Type “CMD” in the text box and hit CTRL + Shift + Enter to open the Command Prompt in admin mode.
- Click on Yes in the UAC confirmation panel.
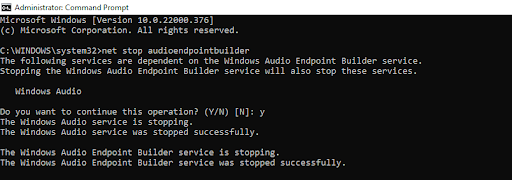
- When you see the Administrator: Command Prompt, type the following commands and hit enter after typing each line:
net stop audioendpointbuilder
net stop rpcss
If the Command Prompt asks for confirmation at any point, type Y and press the Enter key.
Note: stopping the Audio Endpoint Builder automatically stops the Windows Audio service.
6. Now, type these commands and press the Enter key after typing each:
net start audiosrv
net start audioendpointbuilder
net start rpcss
7. Restart your computer.
Reinstall Audio Driver
The audio driver is one of the most critical software components related to your system’s sound. It helps Windows communicate with your sound card to produce audio. If it’s broken or out of date, your computer will lose sound.
The driver could be stuck, and reinstalling it will resolve the problem in most cases. However, to reinstall it, you have to go through the device manager to uninstall your sound device. After uninstalling it and restarting your PC, Windows will reinstall the driver automatically.
- Right-click the Start button or tap the Windows logo + X keyboard shortcut.
- When you see the Power User menu above the Start button, click on Device Manager.
- Now, expand the “Sound, video and game controllers” section.
- Right-click your audio device and select Uninstall Device when the context menu appears.
- Click on Uninstall in the confirmation box.
- Once Windows completes the uninstallation, restart your computer.
- After your PC reboots, it will automatically reinstall the audio driver. If it doesn’t, head to the next solution to update your driver.
Update Audio Driver
An outdated or faulty audio driver could cause the sound issue. If reinstalling your current driver doesn’t solve the problem, your next step is to install the sound card’s latest software.
There are different ways to update the sound driver. For example, you could go through Windows Update, download the driver from your OEM website, or use a driver downloader.
Let’s start with Windows Update:
- Click on the Start menu in the taskbar and select the Settings icon or tap the Windows logo and I buttons on your keyboard together.
- After the settings app shows up, click on Windows Update in the top-right corner.
- Next, click on Optional Updates. You can also click on Advanced Options on the Windows Update page and select Optional Updates on the next page.
- Once the Optional Updates screen appears, expand the Driver Updates category.
- Check the box for your audio driver and click on Download and Install.
Note: If you’re confused, check your system’s audio device manufacturer and select its driver. Most computers use Realtek.
- Allow Windows Update to download and install the driver. If it prompts you to restart your computer, click on Restart.
The next method involves downloading the driver from your OEM’s or the sound device’s manufacturer’s website. If you’re going through your laptop’s manufacturer’s webpage, head to the support or drivers page and enter your computer’s make and model.
Make sure you download and install the driver from the official channel. Going through third-party websites could be dangerous as you might end up installing malware.
Once you download the driver, run it and restart your computer.
The third option involves using a driver downloader. Reputable driver-updating programs like Auslogics Driver Updater makes the job easy for you. Once installed, they’ll scan your computer for outdated and defective drivers and automatically update them. Apart from the ease they offer, they’ll help fix other driver issues you don’t know about.
Conclusion
If the methods above don’t resolve the issue, consider resetting your operating system. To do that, open Settings, click on Recovery and select Reset this PC. Note that you can keep your files, but you’ll lose your installed applications.
