To sign up for our daily email newsletter, CLICK HERE
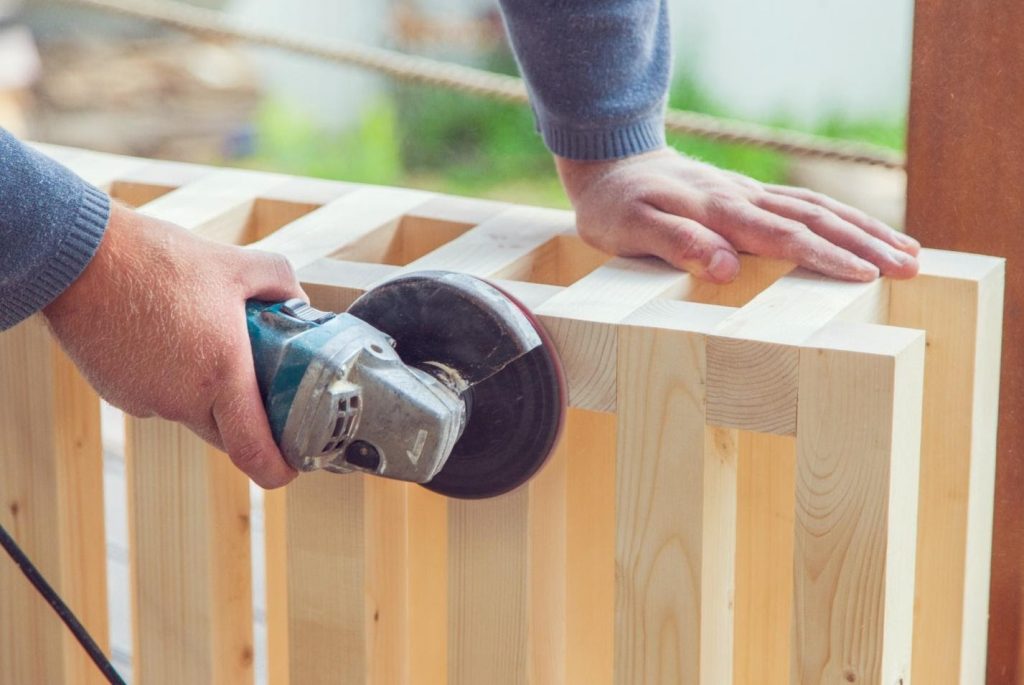
By far one of the most useful and versatile power tools you will find in every carpenter’s shop is the random orbital sander. Learning to use this tool properly and with care, can greatly improve your woodworking projects. There are many ways to use (random) orbital sanders, for example: polishing hard surfaces such as countertops, smoothing joints, finishing countertops, stripping paint, and much more. Check out the reviews at www.ctandm.com.
This versatile tool is a powerhorse, doing the finer jobs as well as the rough ones. Unlike its predecessor, it leaves minimal swirling scratches when properly used. Sanding is a tedious task – and many DIYers dread it altogether. The use of an electric sander speeds up the process significantly, and after using a random orbital sander – anyone will agree that the results are truly remarkable.
Using this power tool might not seem like a complicated task, but there are mistakes that new users commonly tend to make. Knowing how to avoid these mistakes beforehand can save you the frustration of re-doing your projects. Remember that sanding is often one of the last steps of a woodworking project and mistakes at this stage can be very discouraging. After you have spent hours designing, shaping and building; you might be put off the entire project if you ruin it at the final stages.
These are five of the most important mistakes to avoid when using a random orbital sander:
Pressing Down
First time users tend to press down on the machine while sanding. This is especially true for people who are already accustomed to manual sanding. Even the smallest amount of pressure from your hands can have a great impact on the result of using an electric sander. Additionally, this is usually damaging to the motor of your random orbital sander.
Whenever you apply pressure on a sander, the motor needs to work harder to spin the sandpaper pad. This extra force can cause the motor to overheat and has a significant damaging effect on it. In fact, it could even burn if pressed too hard. Motor damage aside, pressure on your random orbital sander gives an uneven finish, because the tool will not be able to work efficiently.
To avoid this mistake, you must understand the way this sander works. The disc rotates in small orbitals and moves in ellipses simultaneously. It is designed to work with only the pressure exerted from its weight. Try to use the lightest pressure you can manage but do keep a firm grip to avoid the machine slipping away.
Holding the machine by the neck can help you to avoid bearing down on it. Some sanders have a side handle that can help you distribute pressure more evenly and control the tool better.
Too Fast or Too Slow
It is common for people to be in a hurry when using an electric sander. Going too fast when using a random orbital sander will likely give lower quality results. Speedy sanding means you are less attentive to details than when you take your time. Always give the machine time to do its job, so try not to hurry when sanding.
Don’t go too slow either! Going too slow will result in over sanding in some parts of the surface. Varying your speed is also inadvisable. For the best result you will need to move at an even pace, not too fast, but not too slow.
The perfect pace to move when you are using a random orbital sander is around an inch per second. This gives you enough time to be thorough without over sanding the wood. Do not stop your machine at any point, keep moving. Start at one end of your surface and work your way to the end.
It won’t take forever, so be patient. You will soon find yourself accustomed to a pace that works for you and your sander. If you want to finish your work quickly, use sandpaper pads with a larger diameter to cover more area faster.
Tilting
Whenever you see a rough spot or a problem area on the surface you are working on, you might be tempted to tilt your random orbital sander and address that problem. Tilting should be reserved for angle grinders (it’s in their name!); whereas a sander is designed to always be flat on the work surface. Always keep the entire sandpaper pad flat against the work surface, keeping as much of it in contact with the wood as possible.
If you tilt the machine, it is likely to scratch and gouge the wood. This is not easy to fix, especially if you are sanding plywood. Plywood is made of thin layers of wood that have been joined together using an adhesive resin. The outermost layer is usually made of a higher quality wood, and trying to sand an entire layer after scratching is not a good idea.
Even if you do not leave a visible scratch on the wood, slight tilting results in one area being sanded more than the other. This uneven sanding will clearly be visible on large surfaces. When smoothing a joint, if you tilt the orbital sander against the joint only, the edge will likely not be level. The resulting edge is round or cupped, and will be prone to rocking.
Using The Wrong Sandpaper
When choosing sandpaper pads for your random orbital sander, there are two different things to keep in mind. The type of the sandpaper; that is, the type of abrasive material used; and the grit size.
There are a variety of materials used in making sandpaper, each with a different purpose. Some materials are not suitable for use on wood, and will not be mentioned here. These are some of the common sandpaper types used:
- Garnet: This is an abrasive that tends towards the softer side, and can dull quickly. Use this natural grain for the finer finish when sanding wood.
- Flint: It is a durable natural grain, which can be used to strip old paint from wood.
- Aluminum Oxide: Highly durable, this synthetic material is often used to sand hardwoods.
- Zirconia Alumina: It is a very hard abrasive that was synthesized to last long. You will find it useful in the initial stages of sanding rough wood.
There is no need to memorize these, as sandpaper usually comes in packaging with a list of materials it is suitable for. You might find it difficult to decide which type of sandpaper to use, so try out different types on a variety of scrap woods. Once you begin to understand the various types, you will be able to choose the most suitable sandpaper for different surfaces in your woodworking projects.
Grit size is defined as a measurement of the size of the abrasive material used in sandpaper. It is commonly measured as the amount of abrasive material per inch of sandpaper. All you really need to know is that a coarser sandpaper will have a lower grit size, and is used in the initial stages of sanding. Naturally, the finer sandpaper is of higher grit and it is used for fine finishing and polishing. Keep a grid size chart in your workshop to refer to when choosing sandpaper pads.
Grit size is defined as a measurement of the size of the abrasive material used in sandpaper. It is commonly measured as the amount of abrasive material per inch of sandpaper. All you really need to know is that a coarser sandpaper will have a lower grit size, and is used in the initial stages of sanding. Naturally, the finer sandpaper is of higher grit and it is used for fine finishing and polishing. Keep a grid size chart in your workshop to refer to when choosing sandpaper pads.
Not Using a Vacuum
Many people think that using a dust mask is enough to prevent the hazards of breathing in sawdust. However, extra precautions are always a good idea. Most random orbital sanders can be connected to a vacuum, whether they have a dedicated dust collection bag or not. If the sander does not already provide a connection, many inexpensive adaptors can be used to connect the vacuum to your power tool. A vacuum will keep your workspace clean and the air breathable.
In addition to preventing health hazards, using a vacuum is also important in keeping your sander working efficiently. As the sawdust builds up, it gets between the pad and the wooden surface, inhibiting the pad from sanding properly. The result is a patchy surface that isn’t as smooth as it has the potential to be. The motor will also need to work harder, and might heat up. That is why using a vacuum whenever you are sanding is recommended.
Armed with the knowledge of the common mistakes that people make when using a random orbital sander, you can try to steer clear of them. Follow our tips to avoid making mistakes and get the smoothest surfaces possible in your next project.
